

NEARLY INSTANT NOODLES
NEARLY INSTANT NOODLES
Lessons from one thousand bowls of instant ramen and something a little more wholesome.

Thanks for opening this weeks Gristle newsletter…Some weeks, I don’t fancy offal, but there is seldom a week that I don’t consume at least 2 bowls of instant noodles - it has been this way for over a decade now. My sustained need for efficiency in most areas of my life has encouraged a 12 year habit which is totally at odds with my career - and I am totally here for it over one thousand bowls later. Read on to find out how you too can make the best of a very convenient food, or scroll all the way to the bottom if you fancy spending a little longer on comfort xx
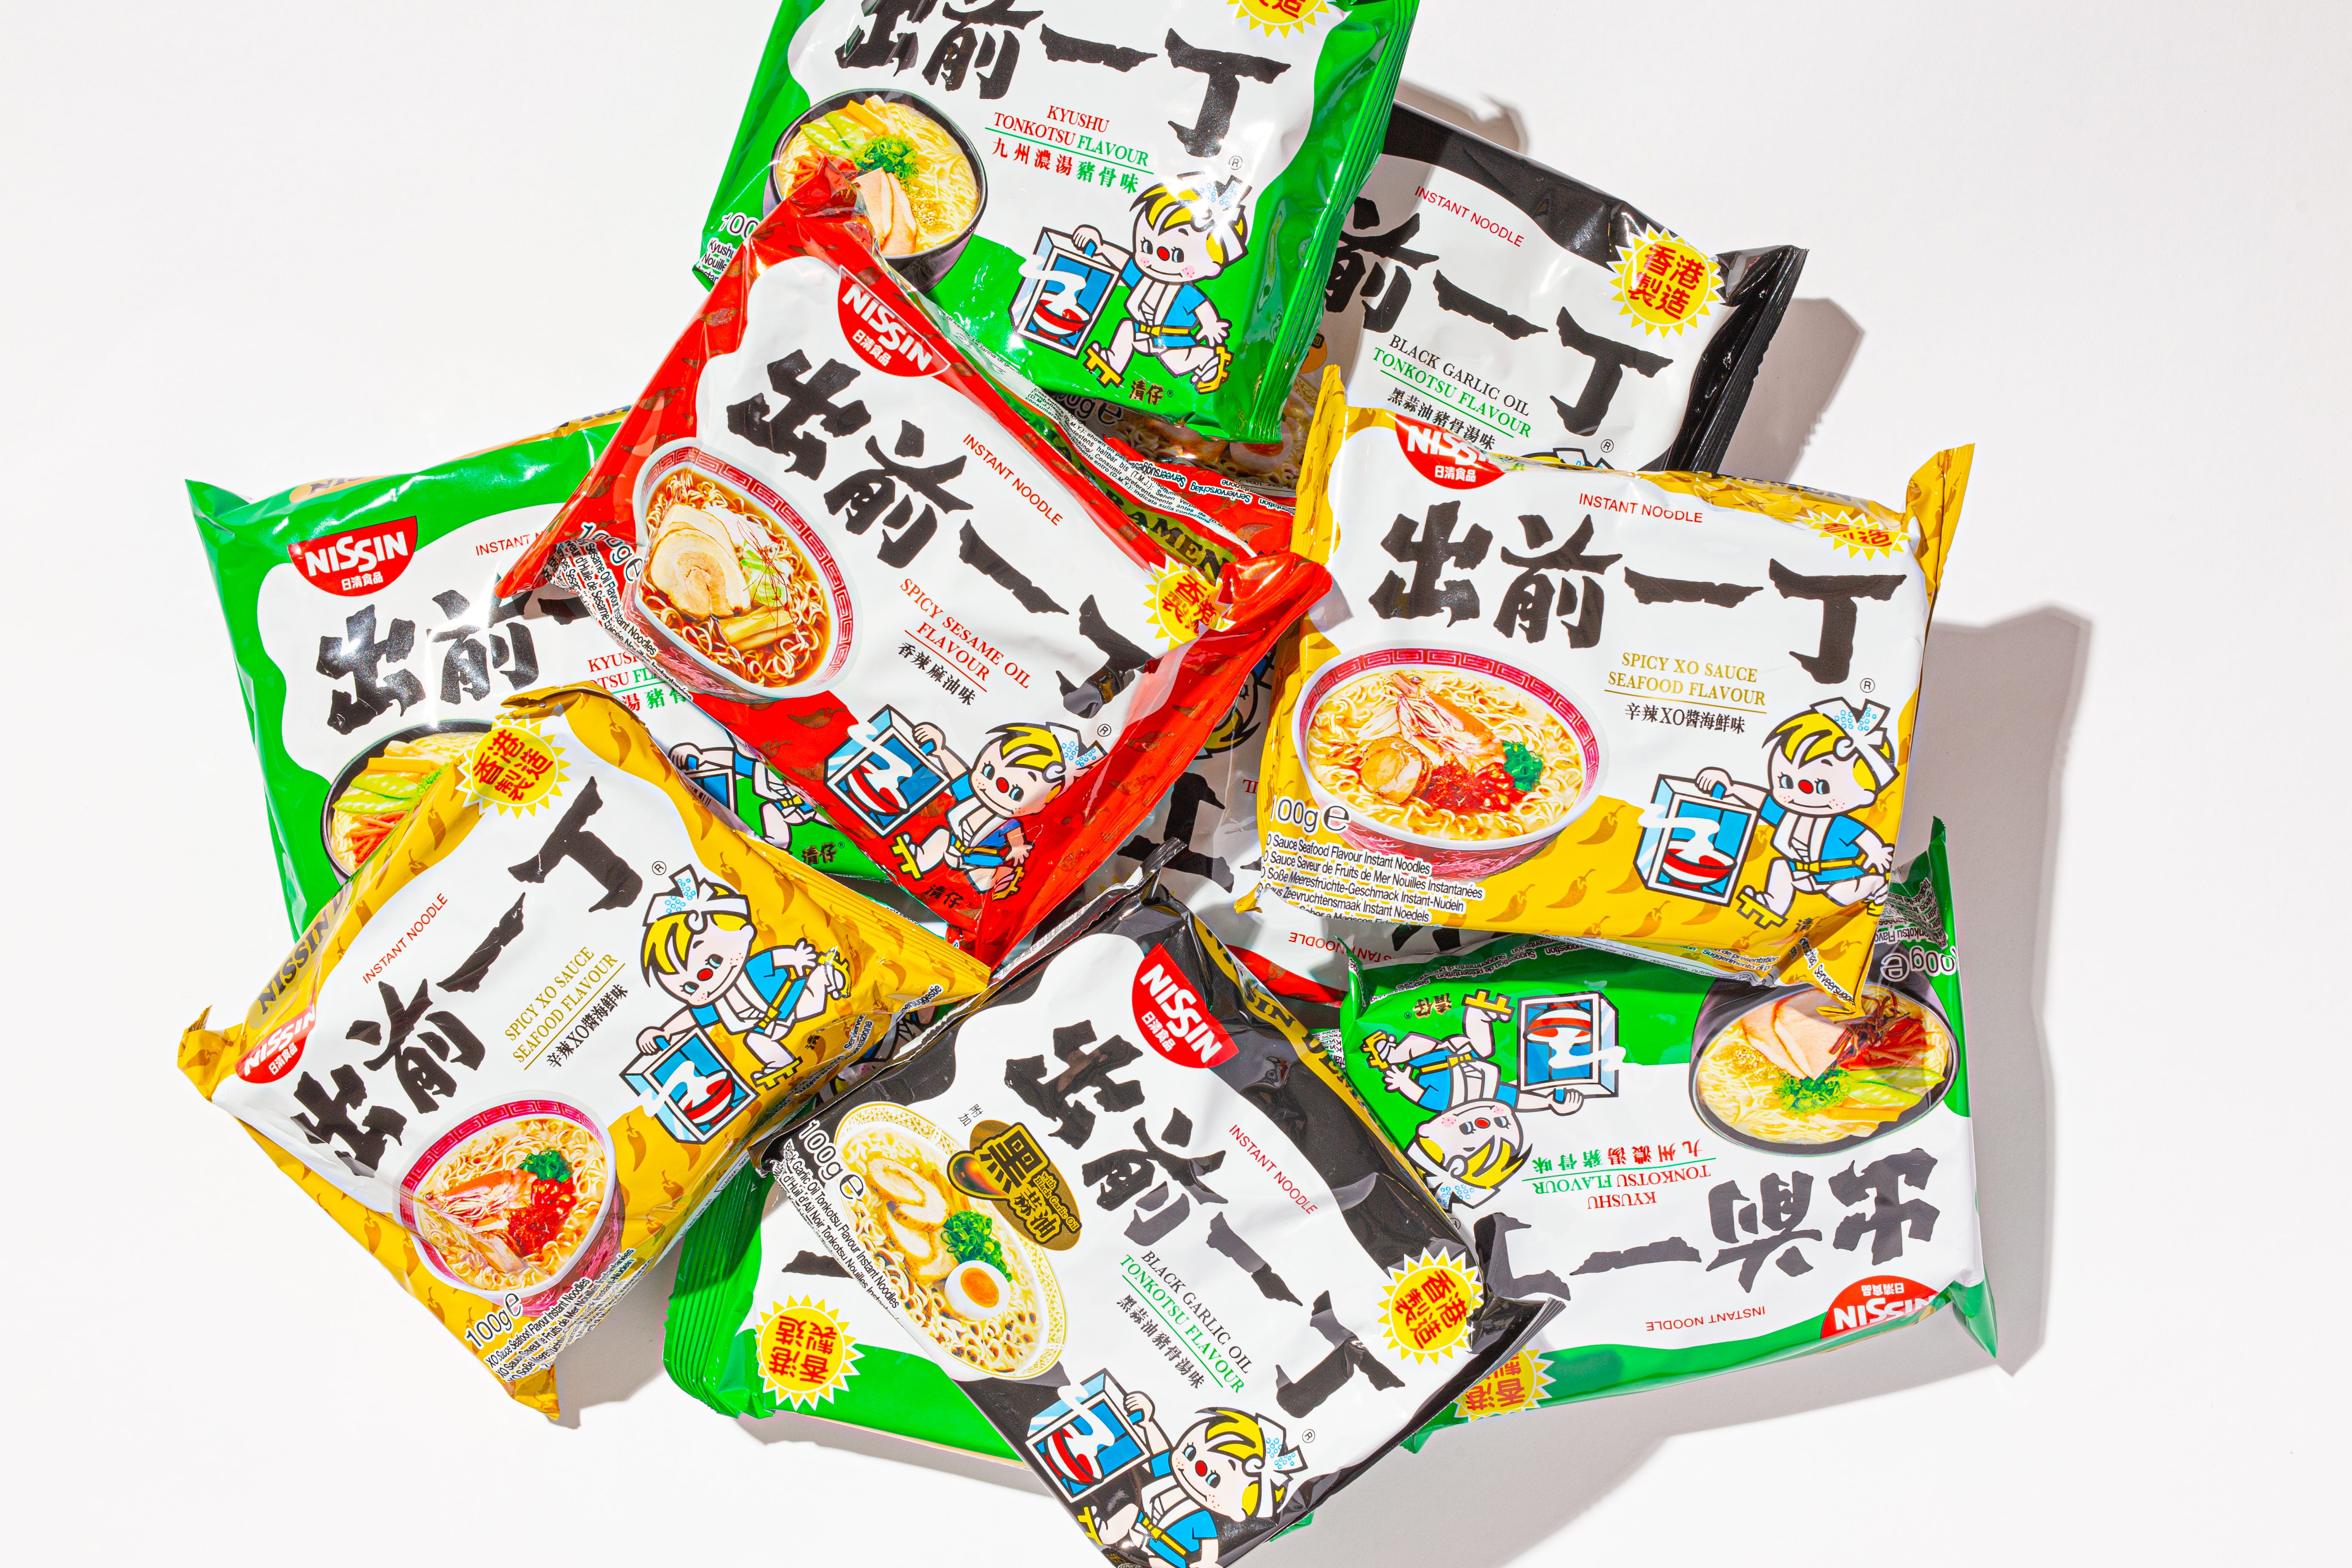
A good bowl of instant noodles starts in the shops. Wade your way through Supernoodle sludge, hordes of Indomie groupies and opt for Nissin Demae Ramen - specifically the pork tonkotsu flavour. I spent far too long in the trenches slurping up mediocrity to see you come to this realisation later than is absolutely necessary. The soup adheres to the noodles unlike any other brand I have tried and the faux pork flavour is more long lasting. Importantly, this brand is readily available in most supermarkets, if you look hard enough. You can usually find it nestled amongst packets of Bombay mix, silken tofu and other foods deemed too exotic for the likes of Adam from sales who still cuts the fat off his bacon. Or has his mum do it.
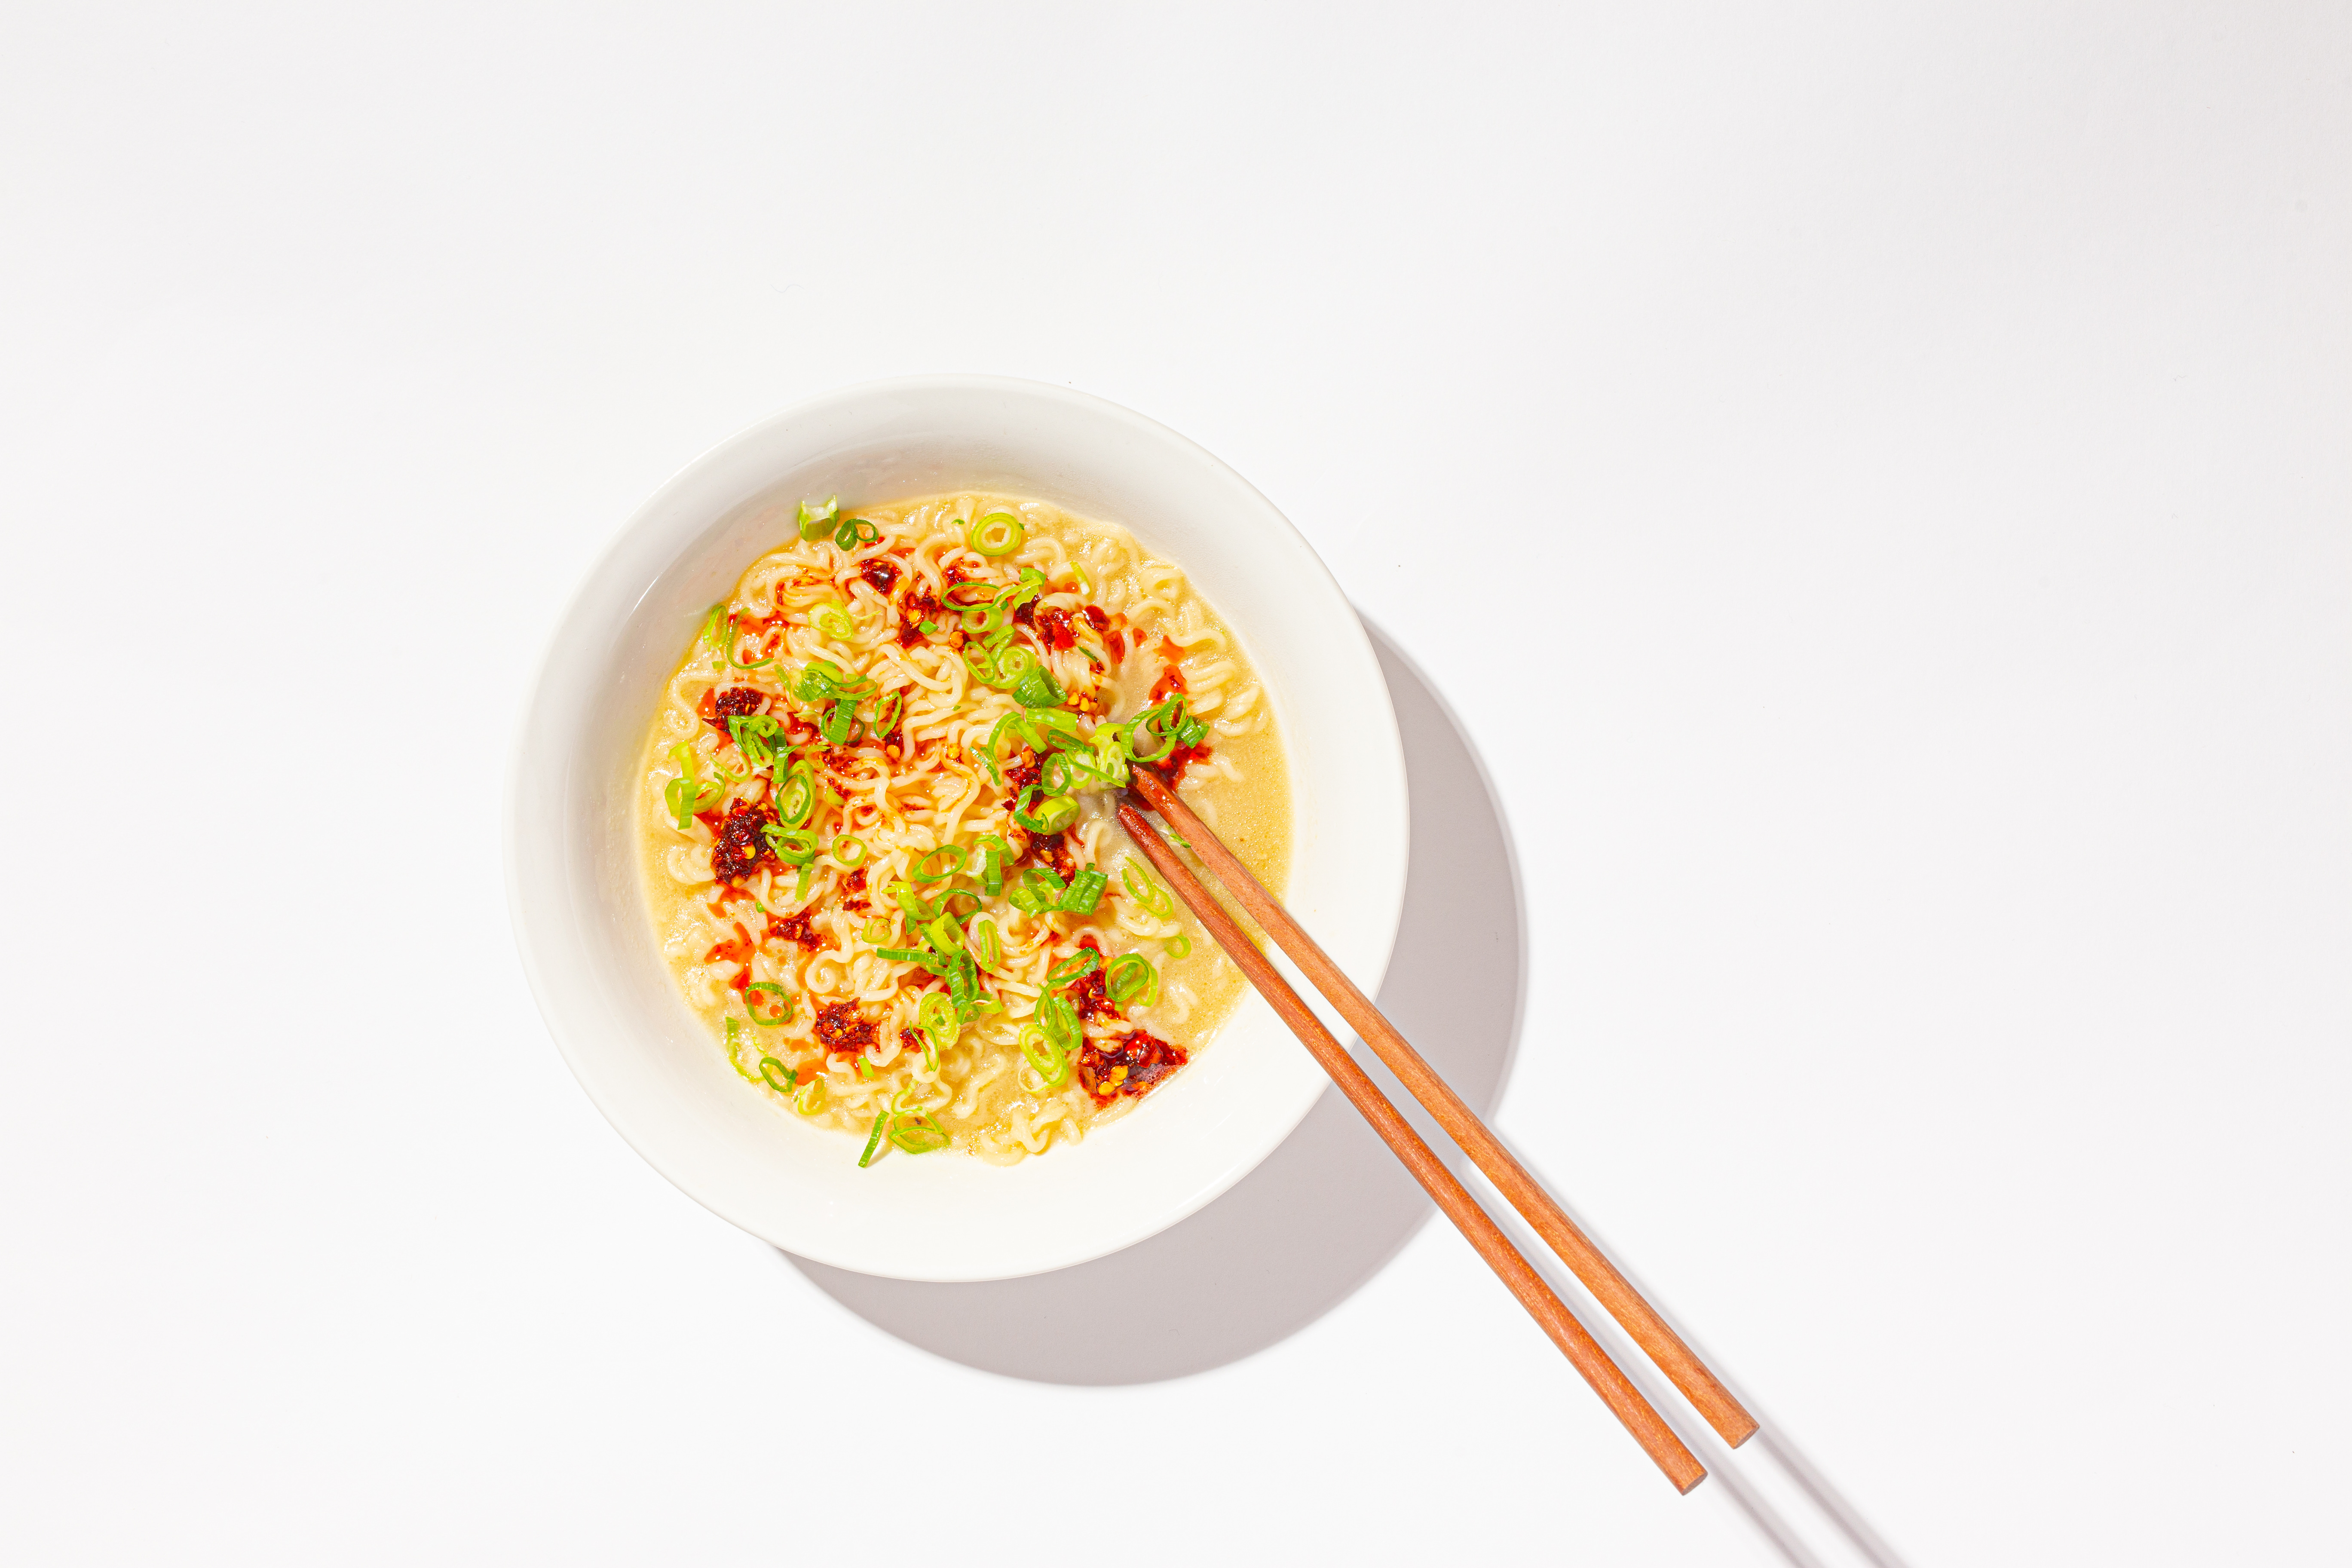
Before diving face first into the “how”, we need to also consider additional toppings compulsory for the optimum experience. Spring onions and a good chilli oil (read down) must be obtained at the very least. Eating a bowl of noodles can become quite a linear experience if not for green allium acidity and pockets of fragrant warmth. For those that live near a well stocked Asian supermarket, furikake and most other Japanese rice seasonings will also serve you well.
MY INSTANT NOODLE METHOD
What started as covering noodles in boiling water and waiting, has evolved to something a little more involved since 2010. There have been many iterations of this method and some real low points. 2012 saw me cook the noodles in water, shake well from most moisture, then toss them through the flavour sachet, dark days indeed. Undercooked noodles coated in what I can only describe as semi-liquid MSG was the taste of a busy summer. Things picked up 5 years later, the realisation that the noodles didn’t have to be covered in water initially for an optimum cook felt like a real breakthrough.
If I had been told 10 years ago that the current method would have this much thought and previous learnings funnelled into it, I would have probably believed every word and asked for the recipe. Follow closely to make what I deem to be the platonic ideal, then use it as a base from which you can add and bastardise to your hearts content.
1 packet instant noodles, see above
Water
1 spring onion, thinly sliced
Chilli Crisp Oil, see below
Tip the noodles into a pan. The pan’s size is important here, they should fit snugly, but should be able to sit flush with the bottom. Empty in the flavour sachet and enclosed sesame oil if applicable.
Tip in enough boiling water to cover the lower half of the noodles and place the pan over a high heat. Once the liquid begins to boil, carefully flip the brick of noodles every 30 seconds with chopsticks, until they unfurl fully.
Continue to boil until the bubbles increase in size, and the liquid thickens to the consistency of double cream, the noodles should have become a little more translucent in this time. Set aside for 1-2 minutes before serving. Serve with chilli oil (see below) and spring onions.
CHILLI CRISP OIL // Makes ≈ 175ml
I spend a little time, when I have time, making condiments once every couple of months for instant noodle-type situations - the times you have nothing in the house, or plenty in the house but no time to cook it in. Adding a spoonful of something home-made to an otherwise processed meal provides the validation that everything is, in fact, ok. Instant noodles are by no means the only processed meal that a good chilli oil can’t see to either. Toss it through steamed pre-made dumplings with plenty of black vinegar for a remarkably complex 10 minute fix.

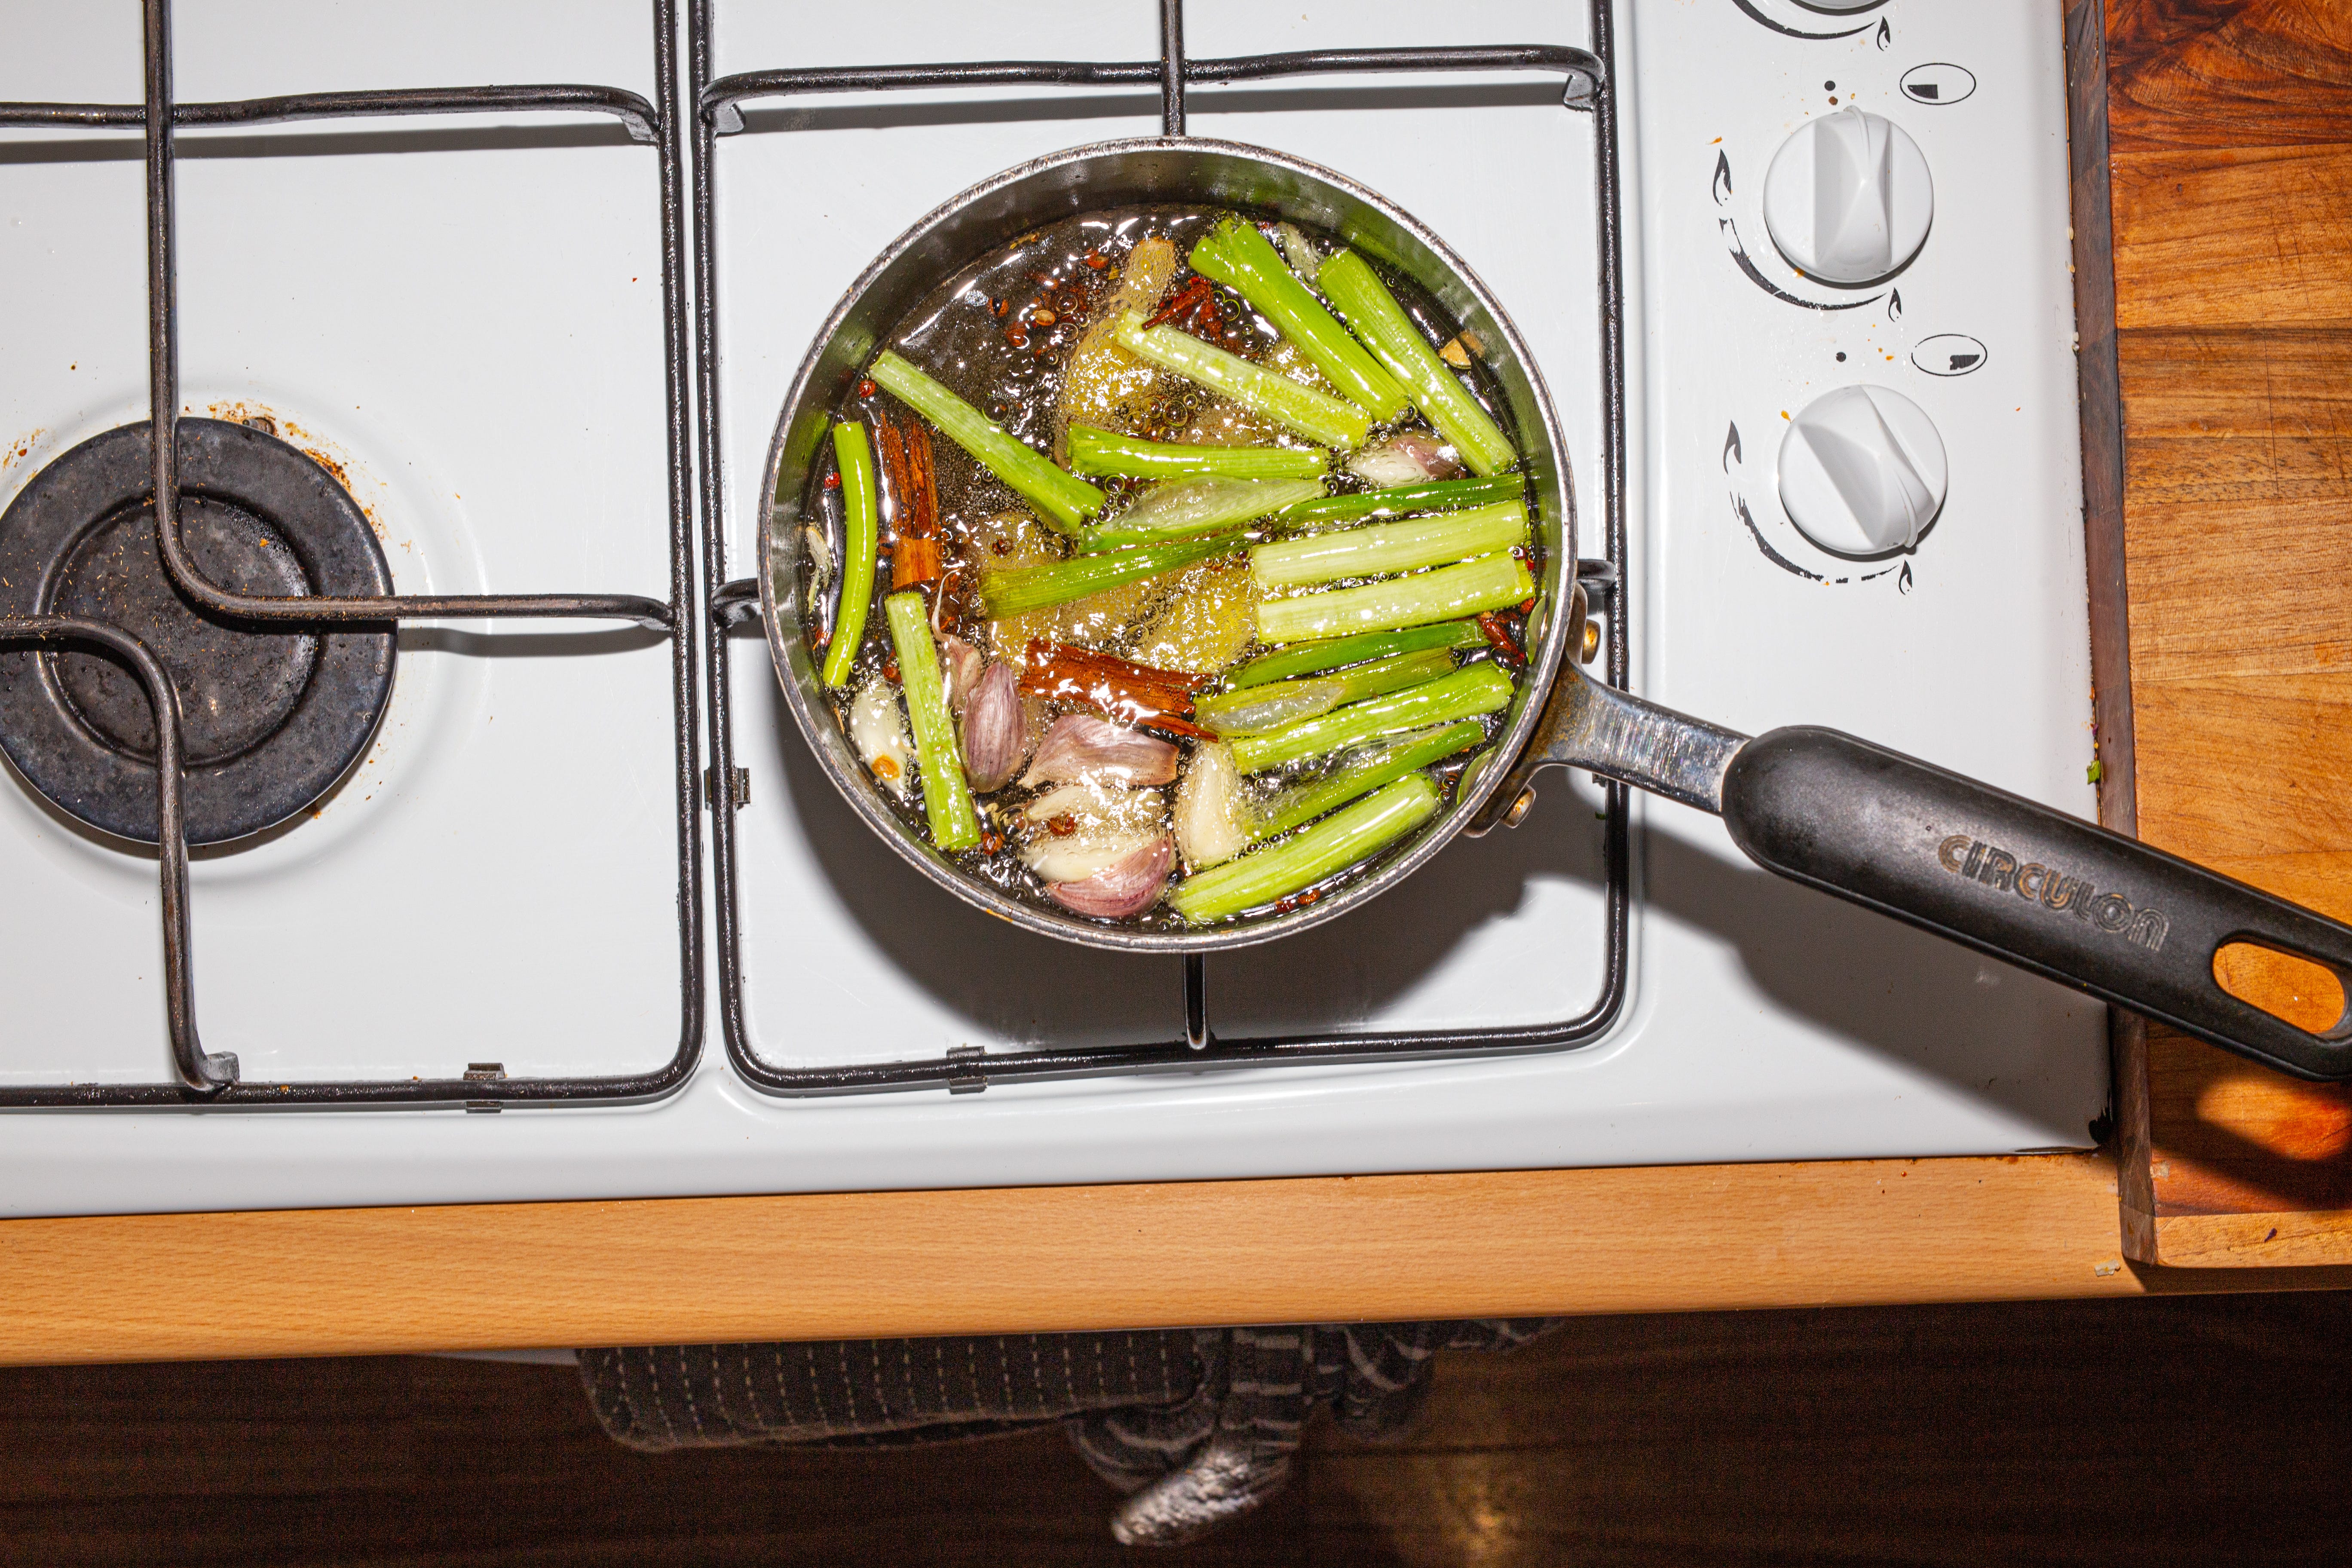
200ml peanut oil
3 spring onions, cut into thirds
10g fresh ginger, cut into thick slices
2 cloves of garlic, unpeeled and flattened
1 star anise
1 small stick cassia
2 cloves
1 tbsp Szechuan peppercorns
15g Aleppo pepper
35g dried mild chillies, blitzed
1 tsp MSG
1 tsp salt
Add the oil, onions, ginger, garlic, anise, cassia, cloves and peppercorns to a medium saucepan and place it over a low flame. Slowly heat everything up and allow it to bubble for 15-20 minutes, until the garlic starts to brown.
Tip the Aleppo pepper, chilli flakes, MSG and salt into another medium saucepan and set a sieve over it. Carefully tip the hot oil over the chilli mix through the sieve.
Set the chilli oil over a medium heat and allow it to come up to a brief bubble before setting aside.
Allow to cool, then store in an airtight container in the fridge for up to 2 months.
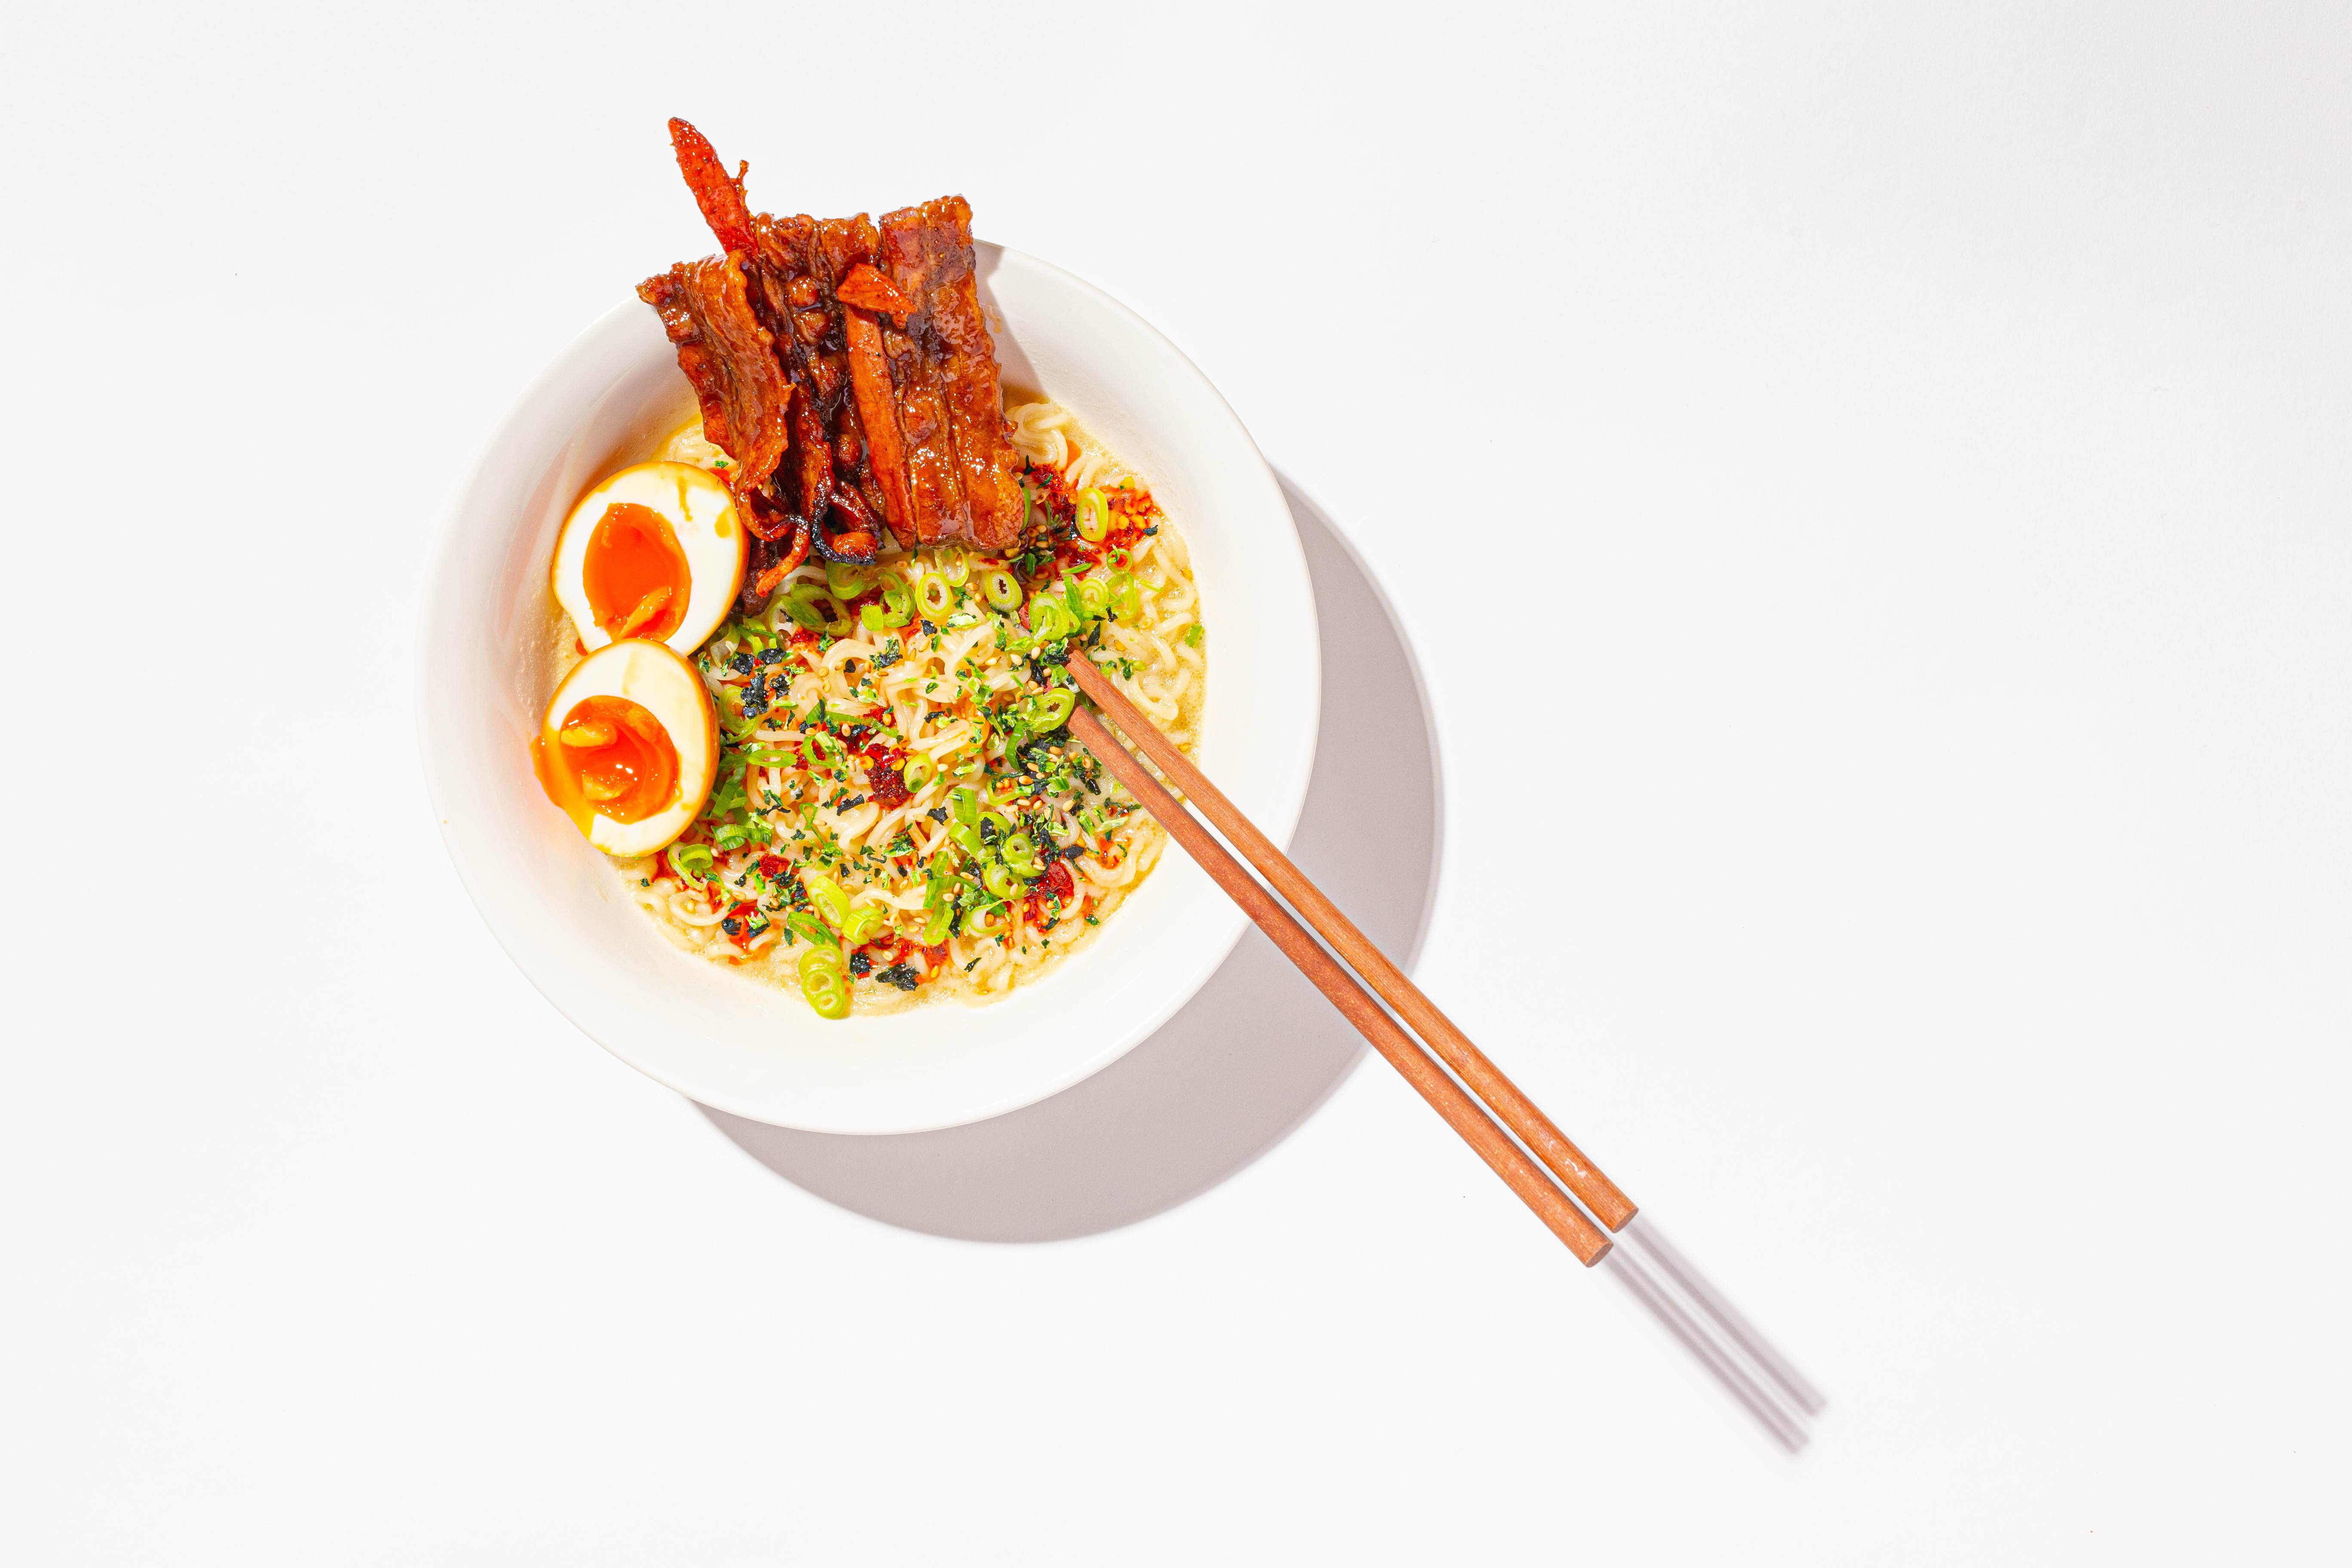
SOY EGGS // Makes 6
I generally make these eggs ahead of time as a form of self care on a Sunday ready for the best half of the next week. Seeing how they change from one day to the next adds a certain element of “the unknown” to otherwise run of the mill lunches. Monday’s egg is often a lot more soft and giving than Wednesday’s. As the week goes on, the yolk becomes more fudgy and tends to darken, the soy favour makes its way deeper into the white too. Lasagne and soy eggs are among the only foods I would contemplate batch cooking, for much the same reason. To an extent, a stint in the fridge does them some good.

4 large room temperature eggs, Burford browns preferred
150ml soy sauce
1 tbsp sugar
Bring a medium pot filled with water up to a boil over a high heat. Once the water starts to boil, carefully lower in the eggs and boil for 6 minutes 30 seconds. Use a slotted spoon to transfer them to a bowl filled with ice water.
Mix the soy sauce and sugar in a tall container while you wait for the eggs to cool.
Peel the shells from the eggs and drop them into the soy mixture, pour in enough water so that the liquid just covers the eggs. You may need to weigh the eggs down with a small glass or plate to prevent them from bobbing up.
Store in the fridge for 2 hours to 4 days, until needed.
10 MINUTE “CHAR SIU” // Serves 2
This recipe was borne late last year, a particularly busy time for me. I wanted the satisfaction of a sticky slow roast hunk of pork, but could not afford the time. Enter bacon - thin slices of cured, readily available pork. Once doused with a quick store cupboard Char Siu-style sauce and blasted in a ripping hot oven, they resemble something remarkably close to the real deal.

2 tbsp soy sauce
1 tsp sesame oil
1 tbsp Shaoxing rice wine
1/2 tsp five spice powder
1 tbsp honey
1 tsp tomato paste
MSG
6 rashers unsmoked streaky bacon
Preheat the oven to 220°C and line a small tray with foil.
Mix together the soy, sesame oil, rice wine, five spice, honey, tomato paste and a pinch of MSG in a large mixing bowl.
Toss the bacon in the sauce to coat the rashers fully. Lay the coated slices on the lined tray. Roast in the oven until deep golden brown and sticky, flip half-way through to ensure an even glaze.
CRISPY CHICKEN N’ BUTTERNUT CURRY SAUCE // Serves 2
I am more disciplined than I used to be with my weekends, which are now a lot more sacred than they once were. Thus, there is seldom a need for time-saving noodles. Instead I have recently turned to slightly longer cooks, but tend to stay away from any daunting “projects” - you won’t find me dicking around with sourdough, delicate pastry masterpieces or multi layered puddings any time soon. I enjoy the feeling of shopping and formulating a recipe on the spot, quite the opposite of my midweek noodle-based experience.
The night previous, we had attended 2 birthday parties, 1 club night and a pub crawl. A riff on a butter chicken seemed like a perfectly pedestrian and acceptable place for the Sunday night creative process to begin.
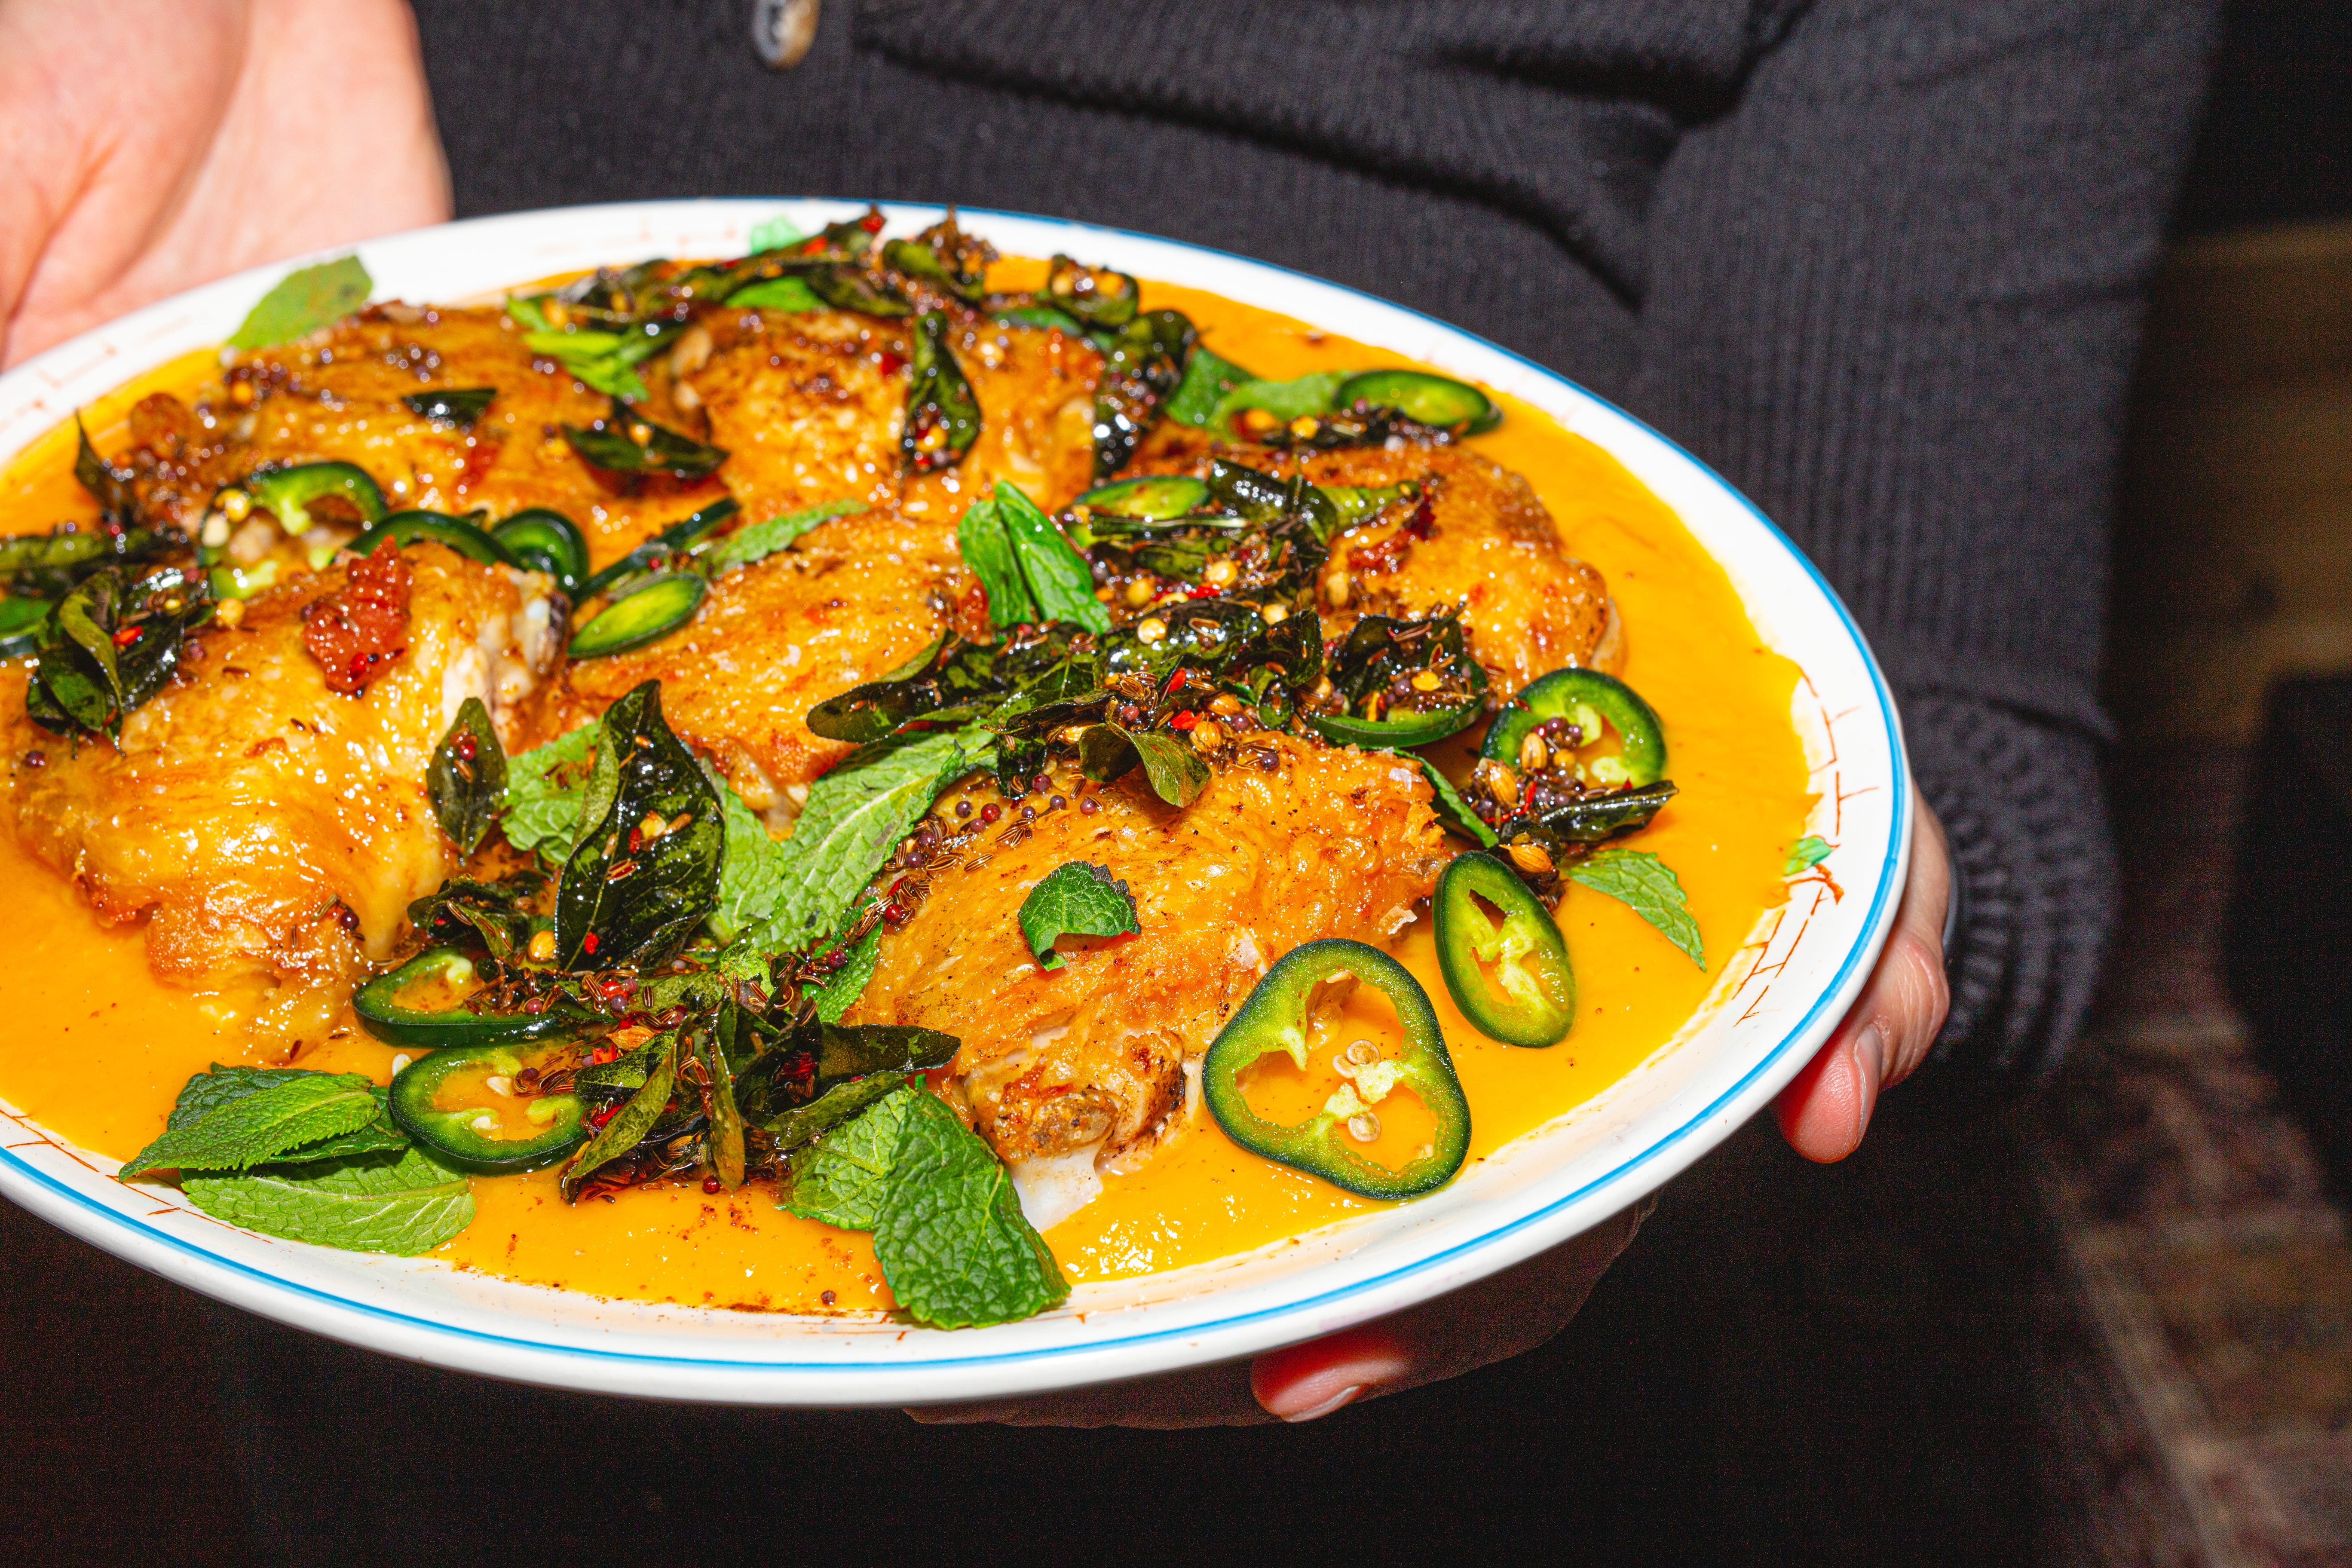
1 small butternut squash, peeled and deseeded
10g fresh ginger, sliced
400ml coconut milk
1 tsp turmeric
2 tbsp vegetable oil
6 small chicken thighs, bone-in, skin-on
50g butter
1 tbsp mustard seeds
1.5 tbsp cumin seeds
1 tsp coriander seeds
1 tbsp mild chilli flakes
1 small handful curry leaves
1 small handful mint leaves
1 green chilli, thinly sliced
Good garam masala
Cut the squash into bite-sized chunks and add them to a large saucepan with the ginger, coconut milk, turmeric and enough water to just cover the squash. Place over a high heat, bring to a boil, then reduce the heat and simmer for 12-15 minutes, until soft throughout.
While the squash cooks, tip the oil into a large frying pan. Season the chicken with plenty of salt and lay them in the pan skin-side down. Place the pan over a medium heat and allow the fat to render from the chicken’s skin. Fry for a further 5-7 minutes, until golden.
Flip the thighs and whack the whole pan into the oven. Roast for 10-12 minutes, until cooked throughout.
Once the squash is ready, drain any cooking liquor through a sieve into a jug. Blitz the squash until smooth, loosen with the reserved liquor if necessary. Season to taste with salt.
Once the thighs are ready, spoon the squash onto a large serving platter and lay on the chicken.
Place the pan the chicken was cooked in over a high heat and drop in the butter. Once the fat begins to foam, chick in the mustard seeds, cumin seeds, coriander seeds and chilli flakes. Fry for 1-2 minutes, until fragrant. Chuck in the curry leaves and take the pan off the heat.
Spoon the spiced butter over the chicken and scatter over the mint leaves, chill and season with a light dusting of garam masala.
love noodles!!!!!